Essential Things to Do after Clean Windows Install
I finally reinstalled Windows today after I've been meaning to do it for months. I went with Windows 7 for fun. I have nothing against Windows 10, really, but I just wanted 7 for fun. A few hours later I installed Windows 10 instead.
Anyway, I decided to write down all the things I need to do to get a barely functioning (for me) install of Windows, inspired by Casey Liss.
Before wiping C:
- Backup the entirety of
C:\Users\youruser\ - Check for save files in %appdata% cough Dark Souls 3 cough Lego Star Wars cough Minecraft cough and back them up
- Copy Windows ISO to USB using Rufus
- Copy drivers and preferably a Ninite installer (see below) to the USB
- Shut down PC
- Unplug ethernet and other peripherals that aren't necessary during installation
- Power on PC, and boot from USB
Installation of Windows
Nothing to point out here. If the drive is over 500 GB, I recommend partitioning it to have ~200 GB for the OS, and the rest for storage.
Post-Installation
Drivers
(Preferably these will already be downloaded onto a USB or other HDD)
- Install motherboard drivers if needed (on Windows 7):
- LAN
- Audio
- Chipset
- USB 3
- Install graphics card drivers after internet is connected (so it can install .NET Framework and other requirements)
- If Nvidia: uncheck Nvidia Geforce Experience
- Reboot
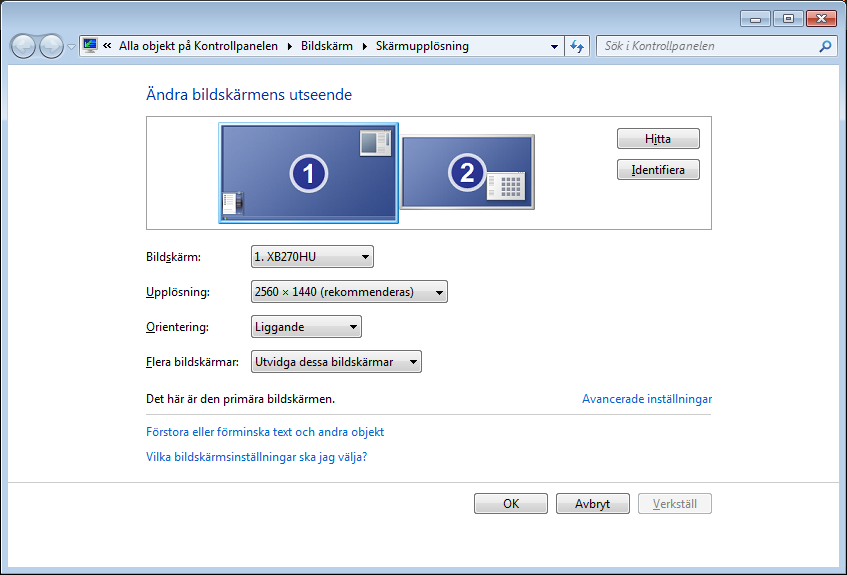
Monitors
- Enable 144 Hz on main monitor
- Set other monitor position to be in the middle:
For Windows 10: Disable Tracking
- Download and run DWT
- Check all boxes except the ones that warn you and apply
Activate
Depends on your situation, but Windows should be activated before moving on
Installing software
- Browse to Ninite and make an installer with (preferably this installer has been done before and stored on USB or other HDD so you don't need to browse with IE):
- Chrome
- Essentials
- qBittorrent
- 7-Zip
- WinRAR
- VLC
- Spotify
- Dropbox
- Python (2.7)
- Filezilla
- Notepad++
- Classic Start (if Windows >7)
- LibreOffice
- SumatraPDF
- Steam
- Everything (if on Windows 10, you need to use a beta version in order to add network drives)
- Reboot
Map Network Drives
- Map M: to Media1 (Plex storage)
- Map N: to Media2 (Plex storage)
- Map O: to Media3 (Plex storage)
- Map X: to Dump (NAS)
- Map Y: to Home (NAS)
Set up Dropbox and 1Password
- Set up Dropbox and wait for 1Password folder in Apps folder to sync
- Install 1Password 4 (at time of writing, version 6 is horrible and doesn't work without an 1Password Account)
Set up Google accounts in Chrome
- Go to YouTube, and log in using first account
- Go to Gmail, and add the other account
- Go to YouTube, and change back to the first account
- Add bookmark titled "Gmail" and point it to
https://mail.google.com/mail/u/1/#inbox - While we're in Gmail, copy the 1Password license key and put it in 1Password
Set up WhatPulse
(If you know your WhatPulse password without needing 1Password, I would do this as soon as you get network drivers working, for accuracy's sake)
- Install WhatPulse, cancel the WinPcap install to avoid network monitoring)
- Log in
- Disable "Open window at startup"
iCloud Bookmarks
- Install iCloud Control Panel
- Reboot
- Sign in to Apple account
- Uncheck iCloud Drive and Photos, but set up Chrome bookmarks
Set up other software
Google Chrome: - Install uBlock Origin - Install 1Password Addon - Visit an English website and set "Never translate from English"
Spotify: - Log in - Enable scrobbling to Last.fm - Disable Right Sidebar/Activity Feed
Steam: - Log in - Add game libraries that are present on other HDDs - Make sure Interface Language is English - Install CS:GO and GTA V if they weren't on the other HDD (but pause their downloads for now)
Everything: - Disable "Run as administrator" under settings - Under Index > Folders, add network drives - Under Keyboard, enable "New Window" shortcut to Alt+Space (to fake Spotlight on macOS)
qBitorrent: - Drag left sidebar to the left as far as possible to hide it - Right click column headers, and disable the hashtag (#) - Open Settings - Downloads: - Change default save folder to X:/Dump - Enable "Append .!qB extension to incomplete files" - BitTorrent: - Seed torrents until their ratio reaches 0.00 and then Pause Them
Filezilla: - Add connection for lambdan.se
Capture Card (PEXHDCAP60L) and AmarecTV
- Open up Windows Audio Mixer
- Go to Recording Tab
- Right click Line-In and click Properties
- In Volume/Levels tab, set volume to 6
- In Listen tab, enable "Listen to this device"
- Install PEXHDCAP60L Driver, version 1.1.0.142.5
- Install x264vfw codec
- Reboot
- Extract amarectv310.zip
- Install live_setup300
- Change region settings in Windows to English/UK to prevent errors when opening AmarecTV.exe
- Configure Amarec
- Disable hotkeys (under Hotkey tab)
- Enable live output under Graph 3 (Live)
- Framerate 60 fps
- Resize 1920x1080
- Output Line 1
- Apply
- Configure Recording Tab
- Video Compressor: Other Codec
- Hit Update Codec List
- Select x264vfw and configure it:
- Preset Ultrafast
- Zero Latency: checked
- Rate Control: "Single pass - ratefactor-based (CRF)"
- Ratefactor between 13 and 17, depends on your mood
- In Extra command line box add
--keyint 1
- Apply
- Video Compressor: Other Codec
- Pick capture card in Device List, and hit Device setting
- Set up the capture card settings page to look like this, apart from the Color Range, set that to your taste:
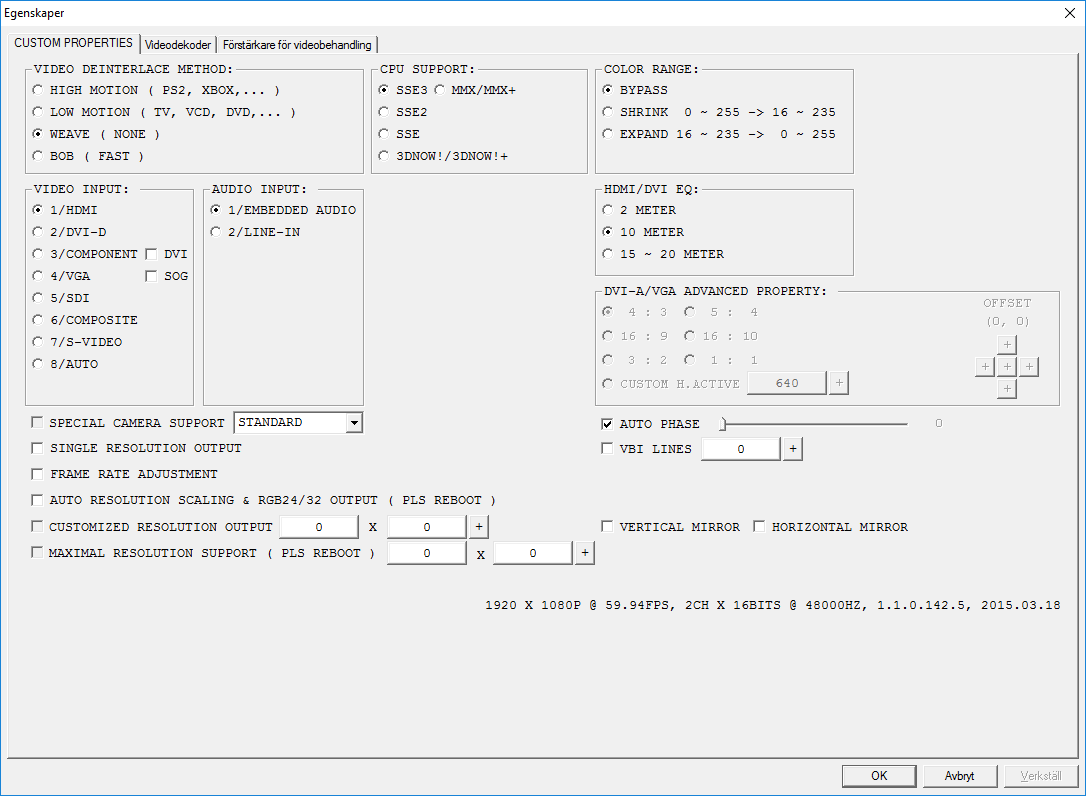
- Set up the capture card settings page to look like this, apart from the Color Range, set that to your taste:
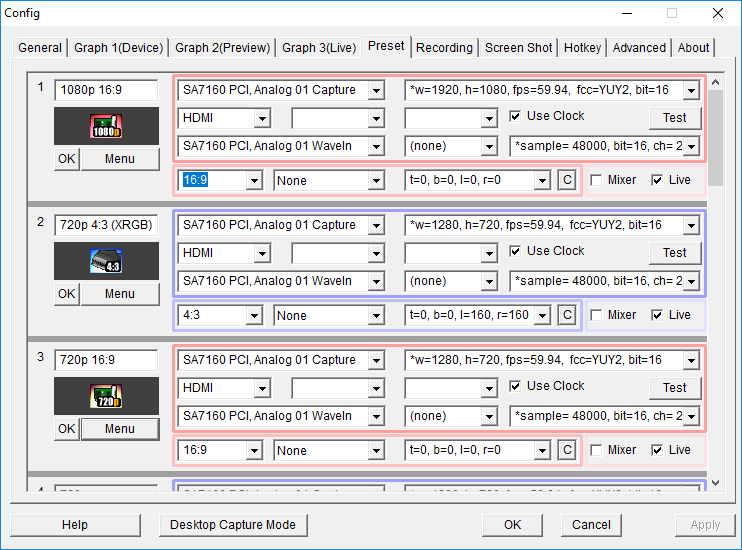
- Set up presets accordingly:
Install and configure more software
- Install MPC-HC x86
- Install KatMouse
- Install Mediainfo GUI Version
- Open it and enable Windows Explorer integration, and set default output to HTML
- Install Subtitle Edit
- Restore User Dictionary and OCR Replacements
- Install Sublime Text 3
- Enable Explorer integration during installation
- Install HWMonitor
- Install MakeMKV
- Register/enter license
- Open up settings
- Video Tab:
- SemiAuto
- Path:
X:/MakeMKV(where X: is a big HDD)
- Language Tab:
- Preferred Language: swe
- General Tab:
- Enable Expert Mode
- Advanced Tab:
- Default profile: FLAC
- Default selection rule:
-sel:all,+sel:audio&(swe|eng),+sel:subtitle&(swe),+sel:(favlang|nolang|single),-sel:mvcvideo,=100:all,-10:swe,-sel:(havemulti|havecore)
- Video Tab:
- Windows 7: Install Virtual CloneDrive
- Install Air Video HD Server
- Set it up like this:
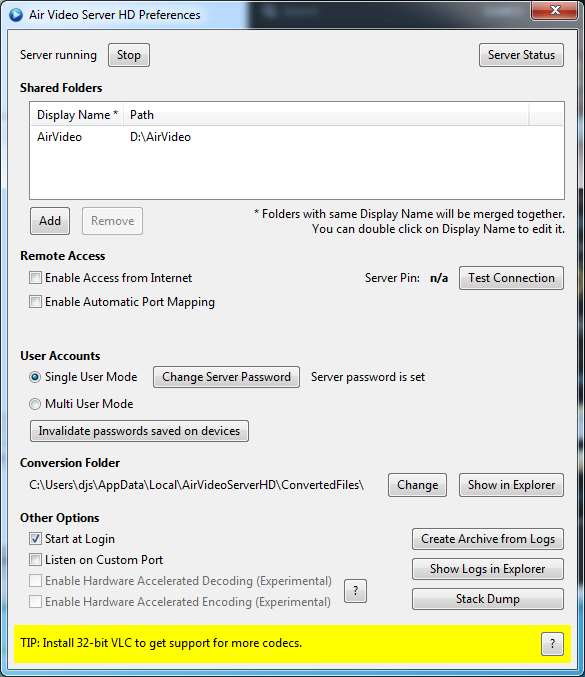
- Set it up like this:
Set up transcode-video, ffmpeg and youtube-dl
- Follow installation instructions here to download and install the tools: https://ryanchristensen.net/how-to-rip-and-transcode-blurays/
- Also download Mediainfo CLI and copy
mediainfo.exeto the Ruby bin folder - Also download youtube-dl and copy
youtube-dl.exeto the Ruby bin folder - When trying
gem install video_transcodingit is very likely a SSL error will occur, do this to fix:- Download GlobalSignRootCA.pem
- Open up
cmdand dogem which rubygems, and navigate to that folder - Go into
ssl_certsfolder and pasteGlobalSignRootCA.pemin there - Now
gem install video_transcodingshould work
Set up cygwin/babun
- Download babun
- Ensure these packages/tools are installed:
- screen
- vim
- ssh
- wget
- curl
- nano
- ssh-copy-id
- Generate ssh key using
ssh-keygen -t rsaand copy it to server usingssh-copy-id user@server - Download vim configuration from https://github.com/lambdan/config and copy it to
~ - Install configuration files from https://github.com/lambdan/config/tree/master/babun
Set up OBS for streaming
- Download and install OBS
- Configure it with your Twitch streaming key
- Configure recording path
- Leave the rest of the settings to when you're gonna actually stream
Restore save files
- From backup you made of your user folder earlier restore all the save files you want
Final Things
- Pin/remove things from the taskbar to have it in this order (left to right):
- Chrome
- Explorer
- Connect to RDP
- Babun/Cygwin
- Snipping Tool
- Spotify
- Steam
- HWMonitor
- MakeMKV
- qBittorrent
- Always show qBittorrent in traybar next to clock
That should be pretty much it for the essentials. After this, I will add whatever is needed whenver it is needed, things such as Origin, Uplay, Battle.net, Skype, Discord, TeamViewer, etc.